Followers

Showing posts with label embossing. Show all posts

Sunday, February 02, 2014

Wanted Dead or Alive Simon Says Stamp and a Cupcake Box Bday Set

Today I'd love to share a couple of projects I've made this week...the first is for Simon Says Stamp Monday Challenge...A Cowboy Challenge...and the second is a cupcake Birthday box with matching card and envie.....ENJOY!!!!
 
here I used an image from Graphics Factory... really don't remember the name of it...sorry...I used Tim Holtz distress inks--cage die (I used Tim Holtz Mirror to cut it out)--plaque and postage die--key and key hole charms--Spellbinders star and tag--Sizzix embossing folder--MS punches--Bo Bunny cardstcok pattern paper..Pebbles Inc for wanted stickers and Making Memories for smaller stickers--other metal star and rope...

 here is a Birthday Cupcake box and card set...I used my Cricut Expression/Sweet Treats cart and cut this out at 5"...Box was cut at 6 1/2"...distress inks--boa--yarn frilly--metal paper for the cupcake wrapper--distress stickles--Inkadinkado Studio G and Stampendous (on inside of card)--My Minds Eye pattern paper--
 here's the card...
side view
cupcake box...I filled with some of the glitz filler...this is big enough to fit an over sized or two regular sized cupcakes...

envie front

envie back...ribbon just slides off...
*********
Well I hope everyone has a wonderful day..make sure you stop over at Simon Says Stamp Challenge an check out all of the wonderful inspiration...it's truly driping in it.... .and it is Super Bowl Sunday...it's party day!!! Hugs from a warm Charm City...
 

Monday, January 30, 2012

Just Because and a Valentine Cards

Happy Monday blogland. Today I wanted to pop in here and share a couple of cards I made. The first is for our Aunt, who is 94 (I think) and hasn't been feeling to well. She got diagnosed with phenomena at the same time as I did, but she is still not feeling to well. I wanted to send her something just for a pick me up...and the second is a Valentine's card with a little pull out tag for a gift card.....ENJOY!!!
I used rubber stamps from Inky Antics...I just love this collection...I paired it with Recollections pattern paper and black jewels--Prima flowers and swirlies-- Ranger stickles and distress inks
I also used a leather frame from Making Memories to pop the inside saying up.. Here's a Valentine's card that I made using things from my already made stash...lol...super simple card....I can't remember how I cut the heart out or the plate I used to emboss it....sorry...I used a tag bag and made a tag for a gift card....
here's the inside....super simple....
tag pulled out
backside of tag where you can add a gift card....
********************
Well peeps, I hope everyone has a wonderful and sunny day...I'm off to tear down wallpaper....next on the list for the house renovations that I've been working on this past year....what fun....Hugs from Charm City...

Wednesday, January 18, 2012

Thank You

Happy hump day peeps....I know..I know..it's two days in a row...I tell ya, I'm going to get back into the swing of things little by little....The sun is shining right through my window here blinding me as I type ......so that makes me believe it's going to be a lovely day in the neighborhood...lol......Well any whooooo--I just wanted to pop in here and say good morning--and to share a card I made a couple days ago.......ENJOY!!!!!
This card (sorry for the photos--it was raining all day yesterday) was made using bits and pieces of past cards that I was working on and never had finished...the background was made using distress inks...and then I sprayed a layer of silver shimmer spritz from Tsukineko....kind of cool stuff...then embossed using distress embossing powder for the snowflakes....hand dyed doily for flower--used a Magnolia stamp--MS punch--Prima flowers and other odds and ends.. here's the inside...you can kind of see the snowflakes...I actually made this background back at Christmas time for a card, but never finished it.... **************** I hope that everyone has a sunny day....I'll be back...I would love to share some of my Christmas projects that I made using stuff from around the house.....Hugs from a sunny Charm City

Tuesday, November 09, 2010

Papertake Weekly--Sketch 50

This week at PTW we have a sketch...super great sketch...and we are being sponsored by Wiff of Joy. So make sure you stop over there and check out the store....she has some lovely things...... here's the sketch for this week from our very own Dawny....you can flip,rotate, twist, well hell, anything you would like just as long as you can see the sketch still....but most importantly--have fun..no wait, have a blast....I did....ENJOY!!!!!! and here's how I used it.....I got out my trusty snowman that I just adore....it's a clear rubber stamp from Inkadinkado.....I stamped onto the background, embossed with a Sizzix folder and sponged distress inks then added stickles to Mr. Snowman and the background edges....I also used clear acrylic snowflakes from Heide Swapp and added a red paper clip and white brad to hold them together, then perched a bird button on top of them....
here's just a closer view of the snowflakes and I popped up Mr. Snowman onto some foam board...well that's all I have for today..stop by and see what the rest of the team has created at PTW........Hope you have a sunny day and many thanks for stopping in....Hugs from Charm City.....

Sunday, August 15, 2010

Stamp It Crazy Challenge

WOOT WOOT!!!! I was asked to be on the new design team at Stamp it Crazy....Barb is just so fun and I really love her stamps and digi's she has in her STORE. You really need to pop over and check out all that yumminess...
...................................................................................................
The theme this week is Boys have Cooties.....we were asked the use the digi image Cindy...isn't she just soo cute....I just love that she has only the top two teeth visible...I used Microsoft word to add my greeting inside her little sign before I printed her off......I also used the Alcohol Ink Faux Bleaching Technique from SCS, but instead of using alcohol inks, I just used distress inks with my sponge and a circle cut out of cardstock to make the background. I rubber stamped the flowers (Tim Holtz), clear embossed, used the sponge to put on the colors then used the mini iron to iron off the embossing powder. It's such a simple technique and I like how it stands out from the background....I cut up an old Manila folder to make the tag and background paper and used the distressing tool (Tim Holtz).....ENJOY!!!!!!
I told ya she was a cutie.....lol.... here's a closer view of the tag..I used metal tape and ran it through my Dymo Label punch (dream) and attached it to a clear button with paper backed.... .................................................................................. Well, I hope you stop by and check out the rest of the Design Team.....they have some amazing projects to share.....and then pop over to the Store and check out what Barb has to offer.........Hugs from Charm City

Monday, December 14, 2009

More Christmas Cards/Bags

Good morning peeps---as promised I have a few more things that I've made these past couple of weeks. Yesterday was a little hectic here as DH and our little one stayed home. They both are once again sick. I just can't believe how they have gotten sick a few times already this season. But we did manage to go out and get our tree yesterday only to bring it home to sit on the patio for the night. I'm hoping to bring it in the house so it can fall (as is needed for a real tree) before we decorate it in a couple days. So for today I'm hoping to get all of the Christmas boxes out of the attic and start the decorations for the house. I know, it's abit late, but we are always "late bloomers"...lol... Lately I have been listening to books on cd's. It's a new addiction that I have right now. And I wanted to share this new series that I have been listening to. I just love mystery/murder novels. And this set of series from Diane Mott Davidson is really kind of cool. The novels are abit slow, but once you get into them are really great. They are about a caterer, Goldie, who has so many mishaps in her business that she gets closed down from the health board/police department for various things. And it seems like murder always followers her no matter where she has a catering gig at. But what I found really cool with these novels that at the end of them, she actually shares the recipes that she mentions in the novel. And the how to's. The best part is that I get all of my books on cd's from the library. I go through and I check them out all at once so I have the whole series (well most of them..the library doesn't carry every single one). So if you are a reader or listener (as I am) and you are into mystery/murder novels this is a series you should check out. She (Goldie) is so funny. She's devorced (who's family is wacked beyond belief) with an adelecent son... and marries a detective in one of the books. Who is just so laid back it isn't even funny. After this series, I'm looking for a new one. Does anyone have any suggestions? Are there any that you have read/listened to that you just loved? Please share... Well here are the projects posted below....Enjoy!!! Remember you can click on the photos for a better view....... this first one is a box that I made using the Tags Bags and Boxes Cricut cart. I used the match2 cut at 8 1/2" for the top and 8 1/4" for the bottom to make like a shirt box. But instead of keeping the card seperately, I actually glue it to the top of the box for the decoration. I also used a frame cut from the Storybook cart and trimmed the sides and used them for the card as well. I stamped the santa, colored it in with Distress inks, added stickles glitter glue and added Tim Holtz clear tiles and cut them out only using a portion of the stamped image for the front of the card. The paper is from Cosmo Cricut. this is a side view this is the card partially opened. I have to say that I really love how this one turned out.
this is another set I made using the same directions as above for the box and instead of using a frame from the Storybook cart I used the flower and circle from the George cart. The sign was made using My Community cut at 5" and the letters were cut from, well I don't remember...lol..(it's an age thing..) if I don't write it down at that moment, I forget..sorry
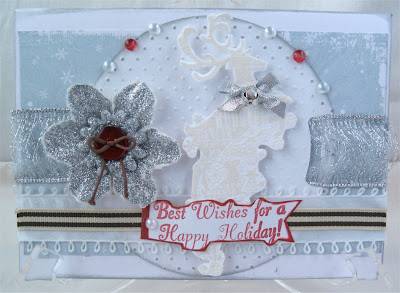
this is the card.......I used the puff embossing powder for the reindeer and the letters (on the box).
this is the front of the box
just a closer view of the puff embossing powder..I am really loving this stuff...
here's just a box, same cuts as above, and I just added paint and some diamond dust to the chipboard ornament from Cosmo Cricket..Just a simple little box...
just a side view....
a little closer view of the diamond dust...sometimes it's really hard to see it in photos....
and here's a little card I made using up this sticker I've had for years. Don't know if I really care for the outcome of this card though. I used the frame from STorybook cut at 4" and the snowflakes from Winter Woodland cut at 2 1/2" and 1 1/2"
Well that's it for today. I hope to be back in a day or two with a few more projects. Have a warm and happy Tuesday...hugs from Charm City

The Pink Elephant Challenge and so much more

WOWZA!!! Where has the time gone. I have been really bogged down with, well I guess, life. I have been able to play along the way though, just haven't had the time to take photos and upload them here. I have so much to share but today I will only post a few things and post some more tomorrow. With it being Christmas time, last year I made everyone a special bag/box (cuz we normally just give out gift cards except to the kiddies) and I have been feverishly trying to get them done again this year. I like to add some other little trinket inside other than just give a g.card and that's it. This year I'm in the middle of making cookies-bread-muffins-fudge, you know, all of those goodies. That is what I'm planning on adding to the insides of these boxes/bags ect that I have been making. So if you can, I would love to know what you all think.
This weeks challenge over at The Pink Elephant is Winter and or Christmas theme. This little set I made for our newphew, that's 18 yrs old. fit perfectly into this challenge. I wanted something different for him and not the normal red/green Christmas colors. These papers are from the holiday stack DCWV from Michaels. These are actually what sold me on this stack. I just loved them. Remember to click on the photos to get a bigger view if you would like to
here's what I used:
tags bags boxes Cricut cartridge--square box --8 3/4"--7 3/4" --6 3/4"
christmas cheer cart--snowman--5"
george cart--circle (I forgot to write down the size for this...sorry)
I used a shaker card pouch from Impression Obsession to add the diamond dust to his belly with the stamped greeting. I still need to add his tag for the nesting boxes to.
view of the card...the top I used the Fiskars scallop punch and made it so it popped off instead of laying flat to the card.
closer view of his belly...
A dear friend, Betty over at Scrap Happy Witch sent this blog award to me a few weeks back and this is the first I've been able to proudly display it on my blog. Thank you so much sweetie. There are a few things I need to do for it, but I will have to add that tomorrow. Thanks so much for thinking of me girl.
This set I made for "someone". Don't know who yet. But one day I wanted to make a penguin and I truly don't care for the ones that are in the Cricut books. So I set out to make one using shapes and got the idea from someone here that does alot of Stampin Up. I don't have everything in front of me right now and a link to her web site, but if someone is interested I can post them at a later time. Just let me know.
Here's the rest:
Christmas Solutions--santas sleigh--2"
tags bags boxes--nut cup--5 3/4"
I also used Heidi Swapp's snowflakes, but you can easily make your own using sheet protectors and cutting them on your Cricut machine.
here's the card
I just love love this little guy.
here's a set of cards I made using the same 4 stamps just changing out the colors of the ink.
Here's what I used:
Storybook Cricut cart used for all of the frames on the cards. Dont remember the sizes, sorry Paper Dolls cart--used for the grass cut at 1" (silver card)
Angel stamp is from The Artful Stamper
background stamp-- Cosmo Cricket Mr. Campy stamp set happy holidays and my friend stamps are from Studio G (these are 2 seperate stamps)
I think this is my favorite out of all of them. The frame I took and clipped off the little thingy from the sides and used them as photo corners.
on this one I used the white puff embossing powder from Ranger to emboss the angel stamp. I really love how it feels.
Well that's it for today. I'll be back tomorrow to post a few more projects and a couple of cards that I have to share. I hope everyone is enjoying their holiday season. Hugs from Charm City....

Sunday, November 01, 2009

Who says black is only for Halloween and C4C9 Challenge

heehee...Happy belated Halloween. I didn't get a chance to post yesterday so I just wanted to wish everyone a belated one. I hope it was a spooky day for you and your families. We had a great time here. We got our first "dog" trick or treater....and I loved it... she was just the cutest little thing you've ever seen. She was dressed up in a little t-shirt for her costume...Come back tomorrow and I'll post some photos from our little one, our little grandbaby and even our poochie in their costumes. And I have to tell you a story of our poochie...it's just too cute...
The card below I made for a challenge over at Crazy 4 Challenges. It was to just create a Halloween card of your choice. I have to say that I really like how this one turned out. Simple and easy. If you get a chance hop on over and play along this week.
This card below is one I just made this morning using Tim Holtz' somewhat idea...you know how it goes. You get inspired by someone else and make it your own. This is my season's postage stamp...at which I cut that from my cricut using the wedding cartridge at 4.5" and the square at 4". Seasons greeting was cut at 1.5" from the Winter Woodland cartridge.
There is so much going on and so many techniques that I used that this really took me all day long to make. I tried to make it so it looked like Mr. Snowman was coming out of a blizzard. He kind of gets lost with all of the embossing and such. I cut everything out of a file folder and used distress inks with a water bottle to color all of it in. The stamp frame I used black fine glitter with just some cheap liquid white glue. The snow flake was colored in with black soot ink then used white ink on top of that then embossed with white puff embossing powder. I did the same thing to the Holtz' sprocket brad and clock hand in the center of the flake. The inside I kept simple using the Martha Stewert icecicle punch with the inking technique. I haven't added the inside greeting yet. Haven't decided what I want....oh, I also used some Magic Scraps shaved ice to make the snow at the bottom. I first put a layer of that snow stuff then added the shaved ice, and hit it with the heat gun. I loved how the heat gun kind of melted the shaved ice. It keeps it on the card instead of it flaking off like it normally does.
here you can see the shaved ice....
here you can see that I changed the color of the sprocket brad clock hand and snowflakes using the white puffy embossing powder. I covered the hand with black glitter glue also..
this is what the inside looks like. Just a super simple one...
I thought I would post a photo of the products that I used in case you were interested.
Well have a happy Sunday and I'll post more tomorrow...hugs from Charm City