Followers

Thursday, February 28, 2019

TBT "Vintage Supplies"

Good Thursday everyone....Do you have a ton of "vintage" supplies? Have they collected layers and layers of dust over the years? Well "TBT Vintage" is the place for you.....lol...I, like yourself, have a ton of vintage supplies...So I was thinking, since vintage and TBT go hand in hand, that I'm going to try and post a project of some sort using my vintage supplies...and I was hoping to inspire you to join in with me every Thursday...

I needed to challenge myself to use my supplies...we all know how easy it is to pick up those new supplies you just purchased...but instead of that, go digging...you will be surprised what you might find....

When I mention "vintage", I'm talking like 3 years or so...and it could range from paper to stamps to embellies and even tools....any kind of product...

So come on, dig out those "vintage supplies" and play along with me on this challenge every week....and if you can't make it every week, play along when you're able to....

So onto my project for this week....Enjoy!!!


Do you all remember these little gems back in the day? All colors, shapes and sizes...printed and non printed...with glitz and aged....well I decided to get one of them out to play. I have a ton of these jars and really need to figure out something to do with them...so this is the first start....
  here again, I decided to take my card layout upwards....this is a 4 1/4" X 9"....my vintage supplies on this card ended up being:
Kraftin Kimmie image
the paper flowers
dyno labeler
sprocket and wooden button underneath it
birds and the nest
silver diamond tacks
pink jewel hanging charms
eye hooks
those little Jole's embellies (front of flower box)
the brick wall stencil
and some Tattered Angels spray (turquoise)
all on a single layer piece of white cardstock that I embossed with modeling pasted to create a background...
 I used a stencil and some modeling paste to add some texture to the door...
 the hanging flower baskets were easy to make...I just rolled up some cardstock and glued into a ball...added the string and eye hook....then added flowers...
 still don't know what to do on the inside....
and here...need to add....
*********
Well, that's all I have for my first TBT "Vintage" ....what do you think? How was my first try at using my supplies? I can't wait til next week....I'm going digging to see what I can find that I lost....lol....see you next Thursday....hugs from a cold Charm City.....

Wednesday, February 27, 2019

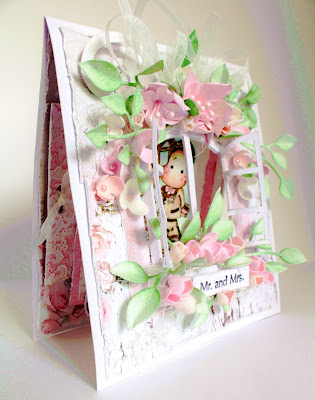
Mr and Mrs Wedding Card

Happy Hump Day...a quick post for today....here's a card I made some time ago and am just now sharing.....Enjoy!!!!

Click links below and it will take you right to the on line store at Magnolia-licious to purchase these products that I used.
Mr&Mrs--couple and swirly's were cut on the Cricut...
The window is a Spellbinders die
others are items from my vintage stash....lol
 inside
side view
 this is how I created the front of the card...I folded the card(6X12) in thirds and cut the front third as pictured...
 
 ....
Well I hope you enjoyed my card for today....hope everyone has a wonderful week...hugs from Charm City....

Sunday, February 24, 2019

Magnolia-licious is going Live

No photo description available. 

Magnolia-licious is pleased to announce it's live tutorial sessions. The 'Saturday Live with Magnolia-licious' bi-monthly lessons will be introduced as from March 16, 2019. Our Design Team will be giving us proper insight into how they color and create. Our first event will take place on the 16th March and will be done by Claire along with Shawn, who will be colouring these Magnolia stamps from the 2018 Magnolia Advent Calendar (Let's Go Collection) with pencils and also create a card. Now the best part of this is that you all can participate. How? First by having the option to buy these stamps in time before the first session with a discounted price but also all those of who are not able to purchase the stamps at this time, can still participate by choosing another image to colour. If you come to the session and take part in the colouring, we will have a place for you to upload your image, and the next session a name will be chosen out of those entered, and someone will win an awesome prize, sent out by Shawn, the Owner of Magnolia-licious. We are on PST, 10:00 am, Alberta is 11:00 am, Ontario is EST 1:00 pm, Halifax is 2:00pm, and lastly Newfoundland is 2:30pm. If you have any questions, please just ask!

Stamp of the Month -- there is also free Shipping on any orders over $75 dollars US or $100 US dollars in Europe and Canada. And apart from Magnolia stamps we carry designer paper, foamiran, dies, and accessories. 

Magnolia-licious on line store link

Facebook Event Link click to check out more details and to let us know if you will be attending. 

Thanks for stopping by.....have a great Sunday and hope to see everyone there at the live tutorial....hugs from Charm City...

Friday, February 15, 2019

Inspiration Friday Magnolia-licious Card

Happy Friday all....are you recovering from all of that chocolate that went into the belly from yesterday?  I am happy to say that I did not have one piece of chocolate yesterday....saved myself some calories.....but hey, who says you can't hold out for that 50 percent off sale.....ha ha

Any who, today I am sharing a design team post for Magnolia-licious...and to remind you about the challenge at Magnolia-licious Challenge Blog.....Enjoy!!!!!
 looking for this months challenge, click here
 Mr. and Mrs. Magnolia stamp - from the You're Invited Collection (right now it's currently out of stock, but if you click above, it will take you to the collection in the store)
Foamiran
the rest are from my stash....oh the window is from Spellbinders.... I added a window box underneath it to add the foamiran flowers and hang the sign....
 side view
 ********
 I really wanted to keep the inside clean, but needed a way to sign and possible add money...so I came up with a pull out tag.....and I love that I can't see it from the front when the card is closed....
 *******
 here's the front of the tag....
 the backside where I added a little pocket big enough for a check/cash...
 the backside of the card...I still need to finish this....
********************
I would like to enter this into the Simply Magnolia Challenge hearts and flowers
*************
Well I hope you enjoyed my card for today....we hope that you can hop over and join us at Magnolia-licious Challenge....Thanks for stopping by...hugs from Charm City

Thursday, February 14, 2019

Happy Valentine's Day and a Little Tutorial

Happy Valentine's Day!!! I wanted to pop in here and share a little card I made using some Crayola watercolor crayons. I didn't know they made crayons for big kids like myself. ...lol..but I am finding that the more I use these, the more I'm liking them...Enjoy!!!
Love is in the Air....
Product Details:
The products I used can be purchased from Magnolia-licious on line store....just click on each to go directly there in the store.....
 
Tilda Valentine Stamp
other products came from my stash...if there is something you're interested in, let me know...
I popped up the letters and Miss Tilda
 side view
 ********
This is what I started with...this time I went with a 4X9....I'm really liking this size right now....


here I took the crayons and did a few wipes onto my mat, sprayed with water and mixed it together..I used a brush to brush it on randomly. I forgot to show you that I did a layer of modeling paste with a stencil....if you would like to see how I use modeling paste, there's a tutorial posted below...

For the letters, I just used my brush and grabbed some color directly from the crayon..just run it back and forth on the crayon.....you would be surprised how much color you can build up on your brush just by doing this method....and once you colored the letter in and you still wanted to make it darker, just repeat until you get your desired color.....
Well that's all I have for today..I'm off and running to finish dinner...we're staying in tonight...making a stuffed chicken with all of the fixings..yummy......hope you enjoyed this little tutorial....I'm new to the crayon world, so I'm learning as I go as well...but so far, I do like what these crayons do.....
***********
Thanks for stopping in today, and I hope you're having a great Valentine's Day!!!!! Hugs from Charm City.....

Wednesday, February 13, 2019

A Little Hello - Polkadoodles

Happy hump day peeps.....just a quick post.....today I thought I'd share a card I made sometime ago and forgot to share....and a reminder to come and play with all of us over at Magnolia-licious Challenge Blog...we would love for you to enter the contest this month....more details are posted below........Enjoy!!!!
Direct Link:
Don't forget to enter our Challenge this Month, using your favorite paper on your card. Also Polkadoodle images are eligible to be used on your projects..... You could win the $20.00 prize and be our Guest Designer next month! We do the draw with a random number generator, so anyone can win!
Sentiment Stamp - Polkadoodles Best Day Ever
 *******
 here's the inside...I really like how simple this ended up being.....
Well thanks for stopping by....stop back tomorrow, I have another little photo tutorial using some water color crayons.....Hugs from Charm City...

Tuesday, February 12, 2019

Challenge 249 Stripes & Circles - Art Impressions

Happy rainy, icy, snowy or whatever it is doing where you live. I swear the weather doesn't know what it wants to do right now. So, tell me, what's it doing in your part of the world?

Today I wanted to share a couple cards I made for the challenge over at Art Impressions blog. I have always been in love with their stamps, but don't get a chance to play much with them. So it really feels good I was able to play along with their challenge. Not to mention, ink up these adorable stamps that I just got. Enjoy!!!!

 Now isn't this just a fun image? Thought this would make for a note card to send someone that might be feeling a little down at the moment.
here is the inside that is partially finished. Looking at it now, I wish I would have added another red layer on the band that goes across....it just doesn't look finished.... 
had an extra city scape so I used it for the back of the card. I'll add something else, I just don't know what yet....
 for the background I used an embossing folder from Tim Holtz Alterations and used clear embossing powder....
I added some distress inks to color it in
 here I used some of that puffy embossing powder to add some texture to the clouds....I actually challenged myself to use some of my vintage product and mix it in with newer...
**************
I would like to enter this card into the following contest


****************

Here's my second card I made right along with the one above....a two-fer...lol....

Howdy Hoe
 Here's another card I thought would make for a note card. This time I went up and this one measures 4 1/4 X 9 ...I have been loving this size lately for some reason....I also used some images from the set I used on the card above....Paper is from Bo Bunny -- Once upon a lifetime collection
 ...........
here's the inside partially finished...I just didn't know what I wanted to use inside yet, so I used my scraps of paper to make the background....I don't know about you, but if I don't do the inside at the time, then I'm scrambling to find the papers I used when I created it....did that make sense? 
*****************
Well that all I have for you today....Stay warm and safe out there....hugs from a very chilly icy Charm City.....


Wednesday, February 06, 2019

Altered Dress Form using Foamiran

Well how the heck are you on this fine Wednesday evening? Me, ok. I wanted to jump in here and share a project I made for Magnolia-licious using some of that crazy foamiran. Not only can you use it to make flowers, but on this project, I used it to make the dress. I truly love love how this turned out. Although there are a few spots that I need to replace with a couple new petals. And maybe a few fillers. But over all, it really was an easy project.

The photos below show the progression of how I put this together for the most part. But you get the idea. If this inspires you to make something, I would love to see what you come up with. Leave me a link in the comment section, and I'll come and visit you.

Enjoy!!!!!

Products that I used from Magnilia-licious
click on each link to take you to the on line store directly
Foamiran
 14 Craft Bar -flower die
Lemon Craft - Forget Me Not pattern paper
wire dress form- from my vintage stash...prolly had her for a good 10 years....

painted it with gesso

I don't remember how many petals I cut...I had to cut more and more and I lost count...sorry


measured and cut the under coat of the dress. ...this lets me have something to glue the petals on


 I started at the bottom with a row of fringe ribbon...then I started layering the petals


 here she is, all finished....I'm sorry I didn't get a chance to take photos of the top part...I just used a piece of paper to cut for the top as a guide...once I got the right size, then I cut a piece of pattern paper and glued it to the frame. All I did was follow the frame to glue...


 side view


this is the back view....I love how the sheer ribbon plays off of the petals for a bit of elegance....

Well, I hope that you enjoyed my little project using foamiran...I really love how this turned out....Thanks for stopping in today and hope you have a great day...hugs from Charm City